Fusion 100
The Fusion 100 can accommodate up to two syringes ranging in volumes from 0.5 μL (0.10 mm I.D.) up to a maximum of 60 mL (26.72 mm I.D.). Syringes of any material (e.g., glass, plastic, stainless steel, etc.) can be used; however, the accuracy of the dispensed volume and the durability of the syringe under higher flow rates will certainly be affected by the type of material used. For more information about syringe selection, please refer to our Selecting a Syringe article.
Syringe Pump Instructions
Loading – Fusion 100
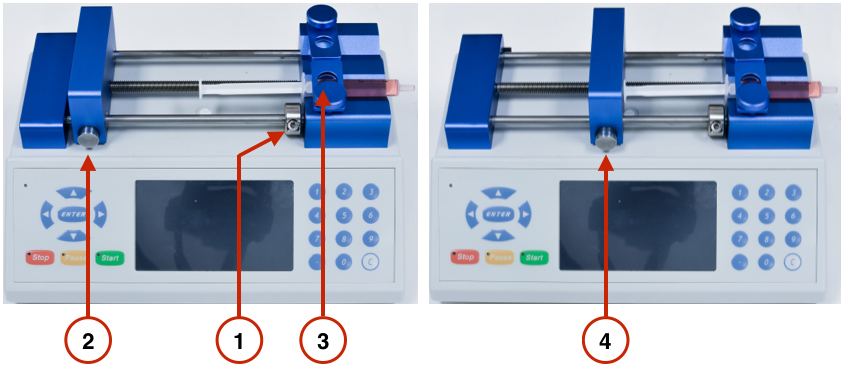
- If necessary, move and tighten the infusion safety collar (see our Adjusting the Safety Collar article).
- While pressing in the lock-release button, slide the pusher block all the way to the left.
- Pull up on the spring-loaded syringe clamp and place the syringe in one of the channels of the holder block, Ensure that the flange of the syringe barrel is flush against the edge of the holder block. Slowly lower the syringe clamp to secure the syringe in place.
- Press the block release button and slide the pusher block to the right until it is flush against the syringe plunger.
Fusion 200
The Fusion 200 can accommodate up to two syringes ranging in volumes from 0.5 μL (0.10 mm I.D.) up to a maximum of 60 mL (26.72 mm I.D.). Additionally, the Fusion 200 can be expanded to 10 channels using the 10-Syringe Holding Rack accessory. Syringes of any material (e.g., glass, plastic, stainless steel, etc.) can be used; however, the accuracy of the dispensed volume and the durability of the syringe under higher flow rates will certainly be affected by the type of material used. For more information about syringe selection, please refer to our Selecting a Syringe article.
Instructions
Loading – Fusion 200
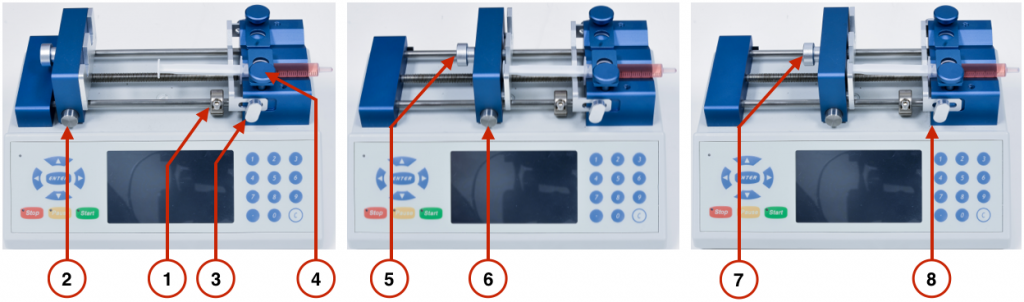
- If necessary, move and tighten the infusion safety collar (see our Adjusting the Safety Collar article.
- While pressing in the block release button, slide the pusher block all the way to the left.
- Loosen the screw knobs for the flange retaining bracket and adjust the bracket such that the flange of the syringe barrel will fit in between. Do not tighten the bracket, yet.
- Pull up on the spring-loaded syringe clamp and place the syringe in one of the channels of the holder block. Ensure that the flange of the syringe barrel is flush against the edge of the holder block. Slowly lower the syringe clamp to secure the syringe in place.
- Loosen the bracket clamp knob for the plunger retaining bracket and adjust the gap such that the plunger cap of the syringe may fit.
- Press the block release button and slide the pusher block to the right until it is flush against the syringe plunger. The plunger cap for the syringe should fit in the gap between the bracket and the pusher block.
- Tighten the bracket clamp knob for the plunger retaining bracket to secure the syringe plunger in place.
- Move the flange retaining bracket flush against the flange of the syringe barrel and tighten the bracket clamp knobs to secure the syringe barrel flange in place.
Fusion 400
The Fusion 400 can accommodate up to four syringes ranging in volumes from 0.5 μL (0.10 mm I.D.) up to a maximum of 10 mL (14.57 mm I.D.). Syringes of any material (e.g., glass, plastic, stainless steel, etc.) can be used; however, the accuracy of the dispensed volume and the durability of the syringe under higher flow rates will certainly be affected by the type of material used. For more information about syringe selection, please refer to our Selecting a Syringe article.
Instructions
Loading – Fusion 400
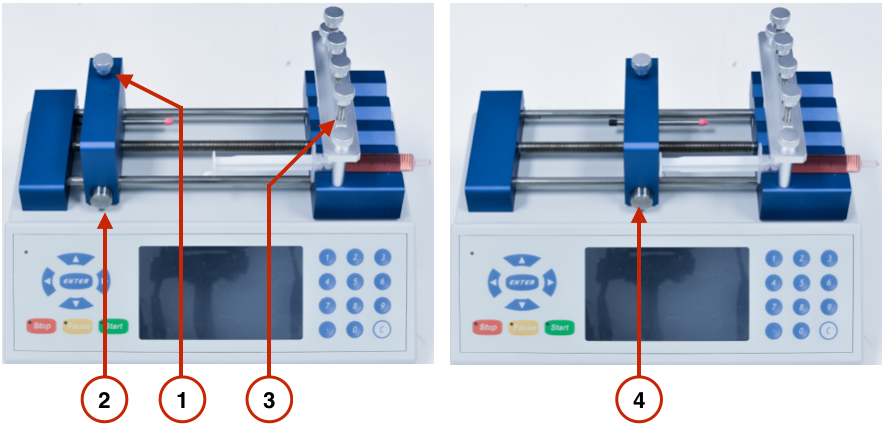
- If necessary, move and tighten the infusion safety bar (see our Adjusting the Safety Collar article).
- While pressing in the lock-release button, slide the pusher block all the way to the left.
- Unscrew the clamp screw knob to raise the syringe clamp and place the syringe in one of the channels of the holder block. Ensure that the flange of the syringe barrel is flush against the edge of the holder block. Lower the syringe clamp by tightening the screw knob until the syringe is secured.
- Press the block release button and slide the pusher block to the right until it is flush against the syringe plunger.