Instructions for Installing and Setting Up Python for the Chemyx Fusion 200X Syringe Pump can be found below with step-by-step screenshare.
Steps Covered
- Downloading and Unzipping the Chemyx Python Driver V2 Folder
- Downloading and Installing Python
- Downloading and Installing Visual Studio Code
- Installing Python Extension
- Installing Pyserial Package
- Running Basic Python Script
- Running the Syringe Pump from Python Program
- Changing the Values within the Code3
Step 1:
Download and Unzip Chemyx Python Driver V2 Folder
Chemyx Python Driver V2
Step 2:
Downloading and Installing Python:
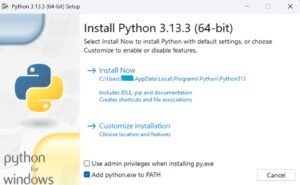
Install the latest version of Python. During installation, make sure to check “Add Python 3.xx to PATH”. See the photo below for reference. Click “Install Now”.
Step 3:
Downloading and Installing Visual Studio Code: Install Visual Studio Code, a code editor made by Microsoft. Go through the default installation process.

Step 4:
Installing Python Extension : Open Visual Studio Code and install the official Python extension published by Microsoft. You can use the shortcut CTRL + SHIFT + X, or go to the menu bar > View > Extensions, then search ‘Python’. Click ‘Install’.

Step 5:
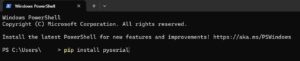
Installing Pyserial Package: Open the Terminal or Windows Powershell program, or in Visual Studio as a last resort. Type in the command “pip install pyserial” (Do Not include the quotation marks) and press Enter. You should get a message saying whether or not the pyserial package installed successfully. This package is necessary for sending messages between the computer and pump.
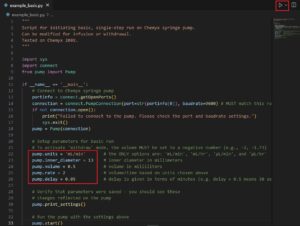
Step 6: Running the Basic Python Script:
- Make sure the pump is powered on and connected to your PC.
- Open the folder ‘Chemyx Python Update’ in Visual Studio Code. If you get a prompt asking “Do you trust the authors of the files in the folder?”, click “Yes, I trust the authors”.
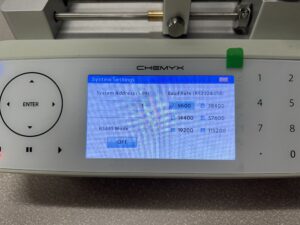
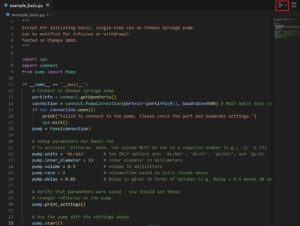
- Open the script titled ‘example_basic.py’. Make sure ‘baudrate’ in the script matches the Baud Rate shown in the ‘System Settings’ of your pump. This can be set and/or verified using the touch screen of the pump. See the photos below for reference.

Step 7:
Running the Syringe Pump from Python Program:
Click on the ‘Run’ button, marked by a play icon in the upper right corner, to run the script. The pump should start after a few seconds. See the photo below for reference.
Step 8:
Changing the Values within the Code:
To modify the values to match your desired parameters. For example, change the rate by setting ‘pump.rate = 4.5’, or remove the delay by setting ‘pump.delay = 0”. Save your changes to the script by using the CTRL + S shortcut or going to the menu bar > File > Save. Click the ‘Run’ button again. The pump should run with your new parameters.
*Things to note*
- These instructions were written for devices running the Windows operating system.
- This code was written using Python version 3.13.3.